Just One More Thread Continues
  • blog

Experimental Cookery part XXXVI maybe

3/7/2019

0 Comments

 
Picture
    Lea & Perrins "for chicken" is no more...
      What's a cook to do?  In this golden age of Internet, we hunt up as many "DIY" recipes as we can find, we compare them to the original ingredient list (L&P, if you no longer make the product, why taunt us by keeping it on your website?  I digress.) and we gather together enough slightly exotic ingredients that our Walmart ads all flip to Strange Foods From Elsewhere.

       And then we play alchemist at the stove.  This is how I did it - borrowed some instructions from one site, ingredients from another, purely guessed at amounts and ratios from the L&P site.  This is fairly sweet, nicely tangy, with just a tiny bit of heat in the background, and very much like I  remember the original.

 White Wine Worcestershire

3/4 cup sweet white wine (original uses sauterne.  I subbed moscato.)
1 T apple cider or white wine vinegar
3 T water

1t yellow mustard seeds
1/4-1/2 t whole peppercorns

abt 1 t minced garlic
1/4 t minced ginger
2 t minced onion
1/2 T butter

1 t capers (or 1/2 anchovy, chopped)
1 t salt (I used pink Himalayan because hey, fancy)
1/4 t tamarind paste
1/2 t Pickapeppa sauce
pinch red pepper flakes

1-1/2 t cornstarch (or equivalent thickener of choice)
1 T sugar or honey

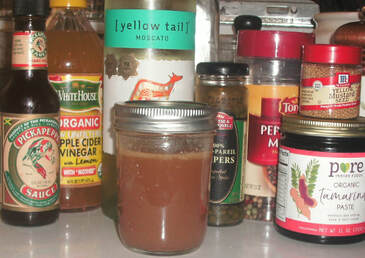
   I found it handy to pre-measure and set out ingredients in the groupings you see here.  Your mileage may vary.

     In a small dry saucepan on medium-high heat, toast the mustard seed and peppercorns for about 10 seconds.  
     Add the butter, and the garlic,  ginger, and onion.  Stir constantly for about 30 seconds or so.
     Add all other ingredients EXCEPT the sugar and cornstarch.  Bring to a boil, then reduce heat and simmer for about 3 minutes.
      Remove from heat.  Strain out all solids, returning liquid to saucepan.
      Return to medium heat and whisk in sugar and cornstarch.  Cook until slightly thickened.
     Let cool, put into glass container with tight-fitting lid, and refridgerate.  Makes about 6-7 fluid ounces, depending on how "thick" you prefer.

    Once you have this basic recipe, you can change it up to your own taste - sweeter, tangier, spicier, add your favorite herbs.  Great for a marinade or cooking sauce for chicken, pork, potatoes, etc.


0 Comments

Condensed for the Freezer

4/11/2017

0 Comments

 
Picture
       I cook a lot of soups, casseroles, etc, and cream-of-something is handy for thickening or sauce-making.    Don't care much for the Mystery Stuff in canned soups, though, so after reading a ton of internet recipes (I love the internet!), I've practiced up what works for us.  I cook these in large quantities, and package for the freezer in one-meal quantities.  Don't be afraid to experiment and substitute with these!

 Condensed Cream of Chicken (or whatever!) 
 1 qt chicken stock/bone broth
 1 qt heavy cream 
 1-1/2 cup carrots, chopped 
 1- 1/2 cup onions, chopped 
 1 cup celery, chopped
 2 T lemon juice 
 4 T butter 
 1/2 t garlic powder
 1/2t onion powder
 1/4t black pepper
 1/4t paprika
 dash or two of sage and thyme
 about 1/4c corn starch, 1/3 c. flour, or whatever works of your fave thickener

    Saute the veg in butter, or simmer for about 15 minutes in the boiling stock.  Add all seasonings and the lemon juice;  set aside about 1 cup of stock for your thickening slurry.
     When the veg are fork tender and the stock is at a slow boil, stir in heavy cream.  
     While the pot is coming back to the boil, add your thickener to the set aside stock and stir until smooth.
      When pot is back to a boil, stir in the thickening slurry, stirring constantly to beat out any lumps.  Reduce heat to a low boil, and stir thoroughly and constantly until the soup reaches the wanted consistency. Once thoroughly cooked, remove from heat, taste and adjust seasonings, allow to cool before packaging and freezing. I find 8-10 ounces to be a handy size for cooking; the number of containers will vary with how "condensed" you make it.
   Depending on substitutions, this can be cream of chicken, cream of vegetable, cream of onion, celery, broccoli - whatever you need.  Milk can be sub-d for the heavy cream; butter can be left out entirely if you're cutting fat.  Chop the veg larger or smaller, depending on whether you need "stealth veg" for picky eaters.

  Condensed Cream-of-Mushroom
 
1 qt beef stock/bone broth
 1 qt heavy cream
 1 lb fresh mushrooms (pref portobello or cremini) chopped
 2 onions, minced
 4T butter
 2 T olive oil
 4T worchestershire sauce
 1/2 t garlic powder
 1/2 t onion powder
 1/2t black pepper
 1/2 t paprika
 salt to taste
 1/4 c corn starch, OR 1/3c. flour, OR whatever works of your fave thickener

  Heat butter and olive oil in dutch oven, and saute mushrooms and onions until onions are translucent.  
   Make slurry in 1 cup of stock; set aside.
  Add in stock. worchestershire sauce,  and seasonings; bring to slow boil.
  Stir in cream, and bring back to boil.
  Stir in slurry.  Reduce heat until the pot reaches a very slow boil, stirring constantly.  Keep cooking/stirring until soup reaches desired thickness.
  Remove from heat, adjust seasonings, and allow to cool.
  Package for freezer - I find 6/8/10 ounces are handy for recipes.  Number of packages will vary according to how "condensed" the soup is.
  

   You can leave out the butter and substitute milk here if you're watching fat.  You can use veggie broth and almond/cashew etc milk for a vegan soup.
0 Comments

Sausage Fest

13/5/2017

0 Comments

 
     Spent the day turning a large pork shoulder roast into 8 pounds! of home-made sausage, first time ever, and I'm kind of proud of today's productivity so I thought I'd share.

     First, had to get all the meat off a big shoulder roast and into grindable-sized pieces.  Accomplished this with only one bandaid needed - this may be a record! (Leave all the fat and stuff in there, BTW - you want it in your sausage.)  Himself arrived home in time to do the grinding for me, and 8 pounds of pork takes some handle-turning, for real.

   The meat (coarse-ground, BTW) is easiest to work if it's really really cold, so after grinding I divided it into 1-lb portions and stuck it back into the fridge while I set out all the goodies needed for seasoning.  Ended up making 3 different sorts, and here come the (very basic, fiddle them to your taste!) recipes.  These are all easy ground-meat style, to be shaped into patties or caseless links as wanted, so no casings or sausage-stuffing machines to fool with, and no MSG, curing agents, or preservatives.

  BREAKFAST-STYLE SAUSAGE
   this one is flavored like old-fashioned home-made sausage.

 1 pound ground pork
 1/2 t. salt
 1/2 t. dried parsley
 1/2 t. onion powder
 1/4 t. paprika
 1/4-1/2 t. freshly ground pepper - I used black, white and pink peppercorns.
 1/4 t. crushed red pepper flakes, or cayenne pepper
 1/4 t. fennel seeds, freshly crushed
 dash or two of nutmeg

  Mix all ingredients by hand until seasonings are worked through the meat.  Cook a small sample (about a spoonful) to check taste (and remember the seasonings will blend and become stronger as the sausage is stored.)  Adjust seasonings as required.  
   If you're going to use this "today", return it to the fridge for at least 2 hours to chill and to let the flavors develop.  If you're storing, you may package it as "bulk", or shape it into patties or little breakfast links before wrapping and freezing.
   
   The original recipes I read called for 1/4 t sage and 1/4 t thyme, but we found we liked this better without these herbs.  Your mileage may vary!


 POLISH KIELBASA-FLAVORED SAUSAGE
  this one is mild but full-flavored, like kielbasa but without the casings and curing.

 1 pound ground pork
 2T red wine vinegar (apple cider vinegar would probably work just as well)
 1 clove of garlic, crushed, or 1 t minced garlic (or more to taste)
 1/2t onion powder
 1/4 - 1/2t freshly ground pepper
 1/4t dried marjoram
 1/2t salt

  Follow mixing, tasting, and packaging directions as above


 SWEET ITALIAN SAUSAGE
 
perfect for pizza, pastas, etc

 1 pound ground pork
 2T red wine vinegar
 2 cloves garlic, or about 1.5t minced garlic
 1t onion powder
 1/2t salt
 1/4 - 1/2t fresh ground pepper
 1/4 t marjoram
 1/2 t parsley
 1 t basil
 1 t paprika
 1/4 t crushed red pepper flakes
 1/4t fresh-crushed fennel seeds
 1t brown sugar
 dash oregano
 
  Follow mixing/testing/packaging directions as above.

  Happy sausaging!
​


0 Comments

Etsy!

8/4/2016

0 Comments

 
     The Practical Blackwork Etsy Shop has launched with a small selection of patterns to see how we do - some new things are included in the launch (or about to be, as soon as I get them uploaded) along with some old familiar faces.  
​
Picture
 

​New at the Etsy store is "One Heart",  a set of designs with which you can create a "family tree" collage for yourself, or a wedding/new baby gift for friends.  Included is the large heart, two small hearts, and a charted text for personalization.

Picture


​Also new are 3 companion pieces based on traditional Eastern European embroidery motifs - Vyshyvanka (left) Ukrainian Rhapsody (below left) and Ruthenian Harmony (below right).    I hope they're as much fun for you to stitch as they were to research and design!

Picture
Picture
0 Comments

Rich Sandwich Bread Recipe

3/2/2016

0 Comments

 
Picture
  By request - my sort-of recipe for "rich" bread.  It started out a long time ago as a recipe from an old Greek cookbook; I have fooled with it mightily since then til it suited our taste.
    The measurements here will make 2 "grocery store" sized loaves (12 inches long), or 3 9-inch loaves, or 3 dozen dinner rolls.  We'll pretend we're doing the big loaves.


 INGREDIENTS - 
3 cups warm water
3 tablespoons active dry yeast
2 large eggs
4 Tablespoons fat-of-your-choice
about 1 scant Tablespoon salt

about 3 cups (or more if you like) good whole grain wheat flour
sweetening of choice - I use 3 handsful of raw brown sugar, or about 4-5 Tablespoons raw honey
"enough" quality unbleached white flour to make a good springy dough
Optional -about 1/2 - 1 cup of seeds, whole grains, chopped nuts, whatever you like.

DIRECTIONS
  Pour water into a LARGE (that biggest Pyrex!) bowl.  Dissolve yeast in the water.
  Add your chosen sweetener, and stir to dissolve.  Add wheat flour, stirring til smooth.
Cover and let proof in a draft-free place for about 15 minutes.

  Beat eggs in a small bowl.  Uncover dough, stir down, then add eggs and fat, stirring thoroughly.  Add salt, and whatever goodies (seeds and such) you want.
  Add flour a couple handsful at a time, stirring thoroughly, until the dough forms a soft ball.  
Turn out onto heavily floured surface; knead in more flour until the dough is pretty stiff and springy, but not yet "dry". (Sorry, this is one of those Granny recipes...)
  Form dough into a flattened ball and place in greased BIG bowl.  Cover with towel and set in a warm place to rise.  
   Let rise for 60 minutes.
  
  Punch down, divide in half.  Form each half into a loaf by your favorite method - I roll mine out thin with a heavy marble pin, then roll up again into shape.  This gives me the best 'no big holes" results.
  Press down into 12" loaf pans (greased or not, as the pan requires).  Cover and set back into warm place to rise again.
   Let rise about 45 minutes 9can be a little longer if required.)

  Center the loaves in a 375-degree oven.  Bake for 10 minutes.

  Decrease heat to 350 degrees.  Turn loaves or trade sides as your oven requires (mine is a 1948 model and requires both!).  Bake for ABOUT 17 minutes, or until the tops are golden brown.
  Remove one loaf from pan and test by thumping bottom - should sound hollow if done.  If not, return to oven for a couple more minutes and test again.

  When done, remove from pans immediately.
 Brush all sides, top and bottom with fat-of-choice.
 Wrap in clean kitchen towels and set on a cooling rack to cool entirely before cutting or wrapping.
  This recipe freezes well when tightly wrapped.

​
Picture
 SOFT BUTTER SPREAD
​   Because yum without preservatives.
This recipe is a mashup of several I found online, fooled with until it works consistently for me and has the taste we like - this is a soft, slightly tangy spread.
   This is a BIG recipe - I divide it into 4 containers, one for the fridge and the other three into the freezer for later.
  Easiest with a big stand mixer.


   INGREDIENTS -
 1 pound of the best butter you can get,  softened to "creaming" stage
 1-3/4 cups of the best PLAIN yogurt you can get
 a scant 1/4 cup veg oil of your choice 
 a dash of salt

 DIRECTIONS
     Cut up butter into mixer bowl.  Start with dough hook, beat in oil til thoroughly mixed.
  Switch to whisk attachment (if you have it).  Add the yogurt by big dollops, whisking at full speed JUST until completely smooth and fluffy - mixing too long may cause separation of whey.
  If there's a little whey in the bottom, that's okay - your spread will just be a little less soft.

  Spoon immediately into 1-2 cup size containers, close, and put into freezer or fridge.  I find this keeps about a week to 10 days in the fridge, and a month or two in the freezer.
​
0 Comments

"Pentecost", and Other New Stuff

21/1/2016

0 Comments

 
Picture


​  A number of folks have emailed me, looking for this pattern.  It's now available for purchase at Catherine's Pascha, along with more Practical Blackwork designs and other lovely stuff.

Picture
 

​  Coming shortly to Catherine's Pascha - new bread/
basket cover designs.  This one is inspired by embroideries from Cephalonia, in the ionian Isles of Greece...

Picture

 ...and this one inspired by the traditional weaving patterns of Crete.  More to come as the Inspiration Faerie strikes...

0 Comments

What's With That Thing On Your Head?

5/9/2015

 
Picture
 In Other News...  That's my actual face.  For a couple of years now, I've worn a headcovering whenever I leave Hardscrabble Farm, not just for Church and prayer.  In the last couple of days I've been asked by several people why ("I didn't want to ask, in case it was cancer or something...")
  Nope, not cancer.  Yes, I have hair.  There are actually several reasons why I decided to cover.  Here's the bullet points - no deep philosophical thoughts, just my ramblings.

Picturephoto of Russian athletes from the Sochi Olympics NBC News
1- Religion.  I am an Orthodox Christian - headcovering for prayer and Church are a traditional thing.  "For this reason the woman ought to have a symbol of authority on her head, because of the angels".
  (Not my bidness to decide that every woman should cover her head.  Got enough trouble keeping the knots out of my own scarf.)

Picture
2- Health.  Have a couple of issues that the added warmth and protection definitely help.  Wyoming winds are tough on trigeminal neuralgia...  extra added benefit, those same winds DON'T mess up my 'do.  (Extra-extra benefit- medical personnel don't ask you to get "automatically naked".  No little paper gowns unless absolutely required!)

Picturephoto pixabay.com
3- Personal Space.  I didn't cut my hair for over 30 years.  For some reason, long hair, like pregnant bellies, draw the hands of strangers - random people were forever touching, tugging, or commenting on my hair.  Headco-vering and "deliberate dress" seems to equal some extra manners.

Picturephoto from betterafter50.com
 4- a dash of solidarity.  I resisted headcovering for a long time because I saw it as a sign of oppression.  It CAN be - whether or not to wear a particular article of clothing, and when and how, should be a woman's choice, not the choice of a man or a government.  Wimmin's bidness.

PictureBridget Sojourner by Richard Riddick, advancedstyleblogspot.com
 5- Style.  Bored of the modern 'uniform' of t-shirt and jeans.  I want to be the ladies of Advanced Style when I grow up.  Why look like everybody else? 
   And maybe it's my own personal reaction to the number of pajamas I see out in public - somehow putting on a headwrap just seems to call for actual clothing to go with it.  Jammies just ain't me.

Pictureadvancedstyle.blogspot.com

6- Just Because!  Not as young as I used to be, or as quick and active, and definitely not as cute - but I still enjoy a good round of Freak The Mundanes.  
   So if you like a certain thing - be it Dr Martens or tutus, flannel shirts or faerie wings - wear it.  Doesn't matter what age you are, what size you are, what WHATEVER you are.  Wear what makes you feel wonderful.
   Freak the Mundanes. Puzzle the Muggles. Keep 'em guessing.   It's good exercise for small minds.

Blouse #2

5/9/2015

0 Comments

 
Picture
  
   This layout again, very casual, bright blue (brighter than I'd like, but that happens when you hove to buy fabric online) cotton gauze.  Simple embroidery under way.

Picture
To tone down the I'M REALLY REALLY BLUE vibe a little, the embroidery is very simple and open, in pale soft colors.  The design is inspired by a traditional pattern from this fabulous website - http://qtp.hu/xszemes/ .  Poke around there and find wonderful things!

    More on this one when the embroidery is finished...

0 Comments

Blouse #1

31/8/2015

0 Comments

 
Picture
    I like to embroider stuff, but there's nothing like a little semi-instant gratification to get new projects off to a good start.
   Found this block-print, Indian cotton voile for a couple of bucks a yard - 4 yards of it came in a regular-sized manila mailer.  Wasn't sure when I purchased it just how i was going to use it, but thought I'd come up with something.
  In particular wasn't a fan of the huge boteh(s), but the other borders had possibilities.

Picture

Closeup of the borders.  The yellow isn't a color that's kind to me either, but I liked the pinky-tan of the ground and the cheerful reds.  I cut the small selvedge-edge borders for my yoke pieces, the removed the wide boteh-border and set it aside for some other project.  Front, back, and sleeve panels were cut so that the remaining floral and geometric border would serve as the hems.

Picture
Considered using the big boteh(s) as sleeves, but that was a bit busy even for my Magpie Eye; I found the small repeat more pleasing.  (Pardon the different lighting of these two pics - the actual color of the fabric background is somewhere between)

Picture
Picture
  Anyway, to keep it short and simple - the finished article!  Rectangular construction (you can o this with virtually no waste if you aren't fancy-cutting for a print), french seams throughout, hand-set yoke with simple red embroidery around the edges.
  First one down, ???? many to go!


Below, the blouse laid flat so the various bits are easier to see - 


Picture
       Calling this one a success, though I'm not sure it's a "Mexican" blouse any more - My Evil Twin says "leave it at hippie".  I think she's right.  
0 Comments

Mexican Blouse beginnings

22/8/2015

0 Comments

 
Picturemexican blouses/skirts, Wikipedia

   I decided to start with the simple style familiar to us old hippies - completely rectangular construction, embroidered yoke and short sleeves.  Since it's summer, some nice light cotton gauze or linen is fabric of choice.


Picture
  Pattern sketch.    Even for a Woman of Gravitas, this can be made
with a couple yards of fabric - the rectangular construction wastes
practically nothing.  The embroidered bits are marked out and worked before construction.


Picture
 Pattern layout.  For your own, you need these measurements to start drafting- across your shoulders (the width of your yoke) your hip measurement + about 4 inches for ease, divided by 2 (the width of your front and back panels).  Then decide how wide/deep you want the neck opening - I chose my yoke pieces to be 3 inches wide all around.
   Many Mexican blouses have the yoke the same size/depth front and back - I raised the back of mine (this helps keep the blouse from suddenly becoming an "off the shoulder" model) and lengthened the back panel accordingly.
   Finally, decide how "deep" an armhole you need - remember there will be a 5-6 inch square gusset inset, so about the depth of the sleeve on your favorite-fitting T is a good place to start for drafting purposes.  
 (  Just for informational purposes, I like a "loose" women's size 26 blouse; my pattern pieces came out as follows - front panel 20"L x 36"w, back panel 27"L x 36"W, horizontal yoke pieces 3" x 15", yoke straps 3" x 7", sleeves 20" x 8", gussets 6" square (add your desired seam allowance to this).  Your mileage will vary with your own measurements... ) 

Picture
  Here is a very very blurry picture of the fit of my first mockup, made in some recycled gauze from another project (it's way short because that's all the fabric there was).  Fit, however, is spot-on, and extremely comfy.  The underarm gussets give you freedom of movement you just don't have in modern-cut clothes.


Picture
  A somewhat better picture on a hanger.  The width of the front and back panels is pleated or gathered to the yoke, the sleeves sewn on "flat", the gussets set in as the side seams are sewn.  
   I have seen vintage blouses where the fabric of the front/back panels is prettily finished at the top, then cartridge-pleated to the yoke so that the top edge forms a pretty little ruffle - I'm thinking I'm not going to be that fancy, but if you do it please send me inspiring pictures!

So the pattern is worked out, mockup fits, fashion fabric is on hand, next we go to the real thing.

0 Comments
<<Previous
    Picture

    Author

    Hi.  My name is Liadain, and I do blackwork.  And stuff.  And blackwork. I can stop anytime I want - after I finish just one more thread....

    Picture
    sleeve panel, original design

    Archives

    November 2017
    May 2017
    April 2016
    February 2016
    January 2016
    September 2015
    August 2015
    July 2015

    Picture
    cuff, green silk on linen. original design

      Talk to Me!

    Submit
    Picture
    site favors, silk on linen

    RSS Feed

    Picture
    Click the banner to go to Practical Blackwork.com
Powered by Create your own unique website with customizable templates.